Overview
API Architecture
Approved merchants will receive Staging API credentials from eCOMM which is required when making a request to the API, here the merchant can start sending requests to our service using our API while sending test data.
Using our staging platform allows merchants to easily integrate to eCOMM in a safe environment while not effecting anything live. Once staging is complete and the merchant is satisfied with the results, eCOMM will provide the merchant with Live API credentials where they can begin live tests using real live data.
Please ensure the below has been obtained before starting:
- eCOMM API Endpoint (Where the POST requests are sent).
- Username
- Password
- Vendor ID
Information
For all HTTP requests the content type must be 'application/x-www-form-urlencoded' so that in the URL, all spaces are converted to '+' symbols and special characters are converted to ASCII HEX values.In addition, the merchant will have to supply eCOMM with the IP Address of the server that hosts the application making calls to the eCOMM API. This is to allow eCOMM to 'whitelist' the provided IP, providing clearance to use the web service.
The merchant must also supply eCOMM with the desired Notification URL & Notification Method, Notification Methods are: Notification, Server & Both. Notification method is required so the merchant receives the correct data when making the appropriate request, please see below for explanation:
- Notification: Once a request is made and has passed validations, the merchant will receive a confirmation notification to the Notification URL (e.g. 0000 - Successful). The merchant will also receive a basic XML document back from the HTTP POST response (e.g. 0008 - Confirmation Received).
- Server: Once a request is made and has passed validations, the merchant will receive a full XML document back from the HTTP POST response (e.g. 0044 - Successful Transaction). There is no confirmation notification being sent in this case.
- Both: Once a request is made and has passed validations, the merchant will receive a full XML document back from the HTTP POST response (e.g. 0044 - Successful Transaction). The merchant will also receive a confirmation notification to the Notification URL (e.g. 0000 - Successful).
Please note that the results are based on what Notification Method the merchant chooses, each section will explain the expected outcomes.
The HTTP Method is POST, all form actions will be POSTED from the merchants website to the API supplied by eCOMM. The supplied Username and Password API credentials must be used to successfully perform a request.
The MessageID is a global unique identifier (GUID) - a 128 bit hexadecimal number that ensures each request has a unique reference.
The APISignature identifies the type of call/request that is being made to the API. It is literally a one word description of the request type. For example, 'register' for the Sale call and 'refund' for refunding a payment. It is essential that the appropriate signature word is included in each request.
The DATA field is where the form details are sent in XML format. This XML document varies depending on the function of the API being executed. All the inputs from the customer facing form must be sent in an XML document in the DATA field, this XML document must match our listed validations which can be found under each API section.
A Sample XML document is included for each request type in this documentation for the merchants reference.
Every call must be identical to the following format when constructing the query: ?Username=SomeName&Password=SomePassword&MessageID=30dd879c-ee2f-11db-8314-0800200c9a66&APISignature=SomeAPISignature&Data=<R>...</R>. This is required in order to access our services correctly without error.
In each API section and under data required, the type of value and maximum character length expected are indicated in the Field Definition column. The merchant must ensure the form does not return values that exceed these limits in order to avoid error responses from the API. Please ensure all specified fields are validated accordingly to prevent errors.
Field Definition - Explanation:| Data Type | Description |
|---|---|
| N(int) | A Numeric sequence of up to `int` digits. Accepts: '0-9'. |
| A(int) | An alpha only string of up to `int` characters. Accepts: 'A–Z' & 'a-z'. |
| AN(int) | An alphanumeric string of up to `int` characters. Accepts: 'a-z', 'A-Z' & '0–9'. |
API Request Fields
| Requirement | Value |
|---|---|
| Content-Type | application/x-www-form-urlencoded |
| HTTP Method | Post |
| Username | Supplied by eComm |
| Password | Supplied by eComm |
| APISignature | Varies depending on API to be invoked |
| MessageID |
A Unique GUID to identify the API call
(e.g. 30dd879c-ee2f-11db-8314-0800200c9a66) |
| Data | Varies depending on API to be invoked |
Sample Request
<?php
function httpPost($url, $params) //Post method
{
	$params = urldecode(http_build_query($params)); //Convert our array of params into query string, URL decode the result to prevent data corruption

	$ch = curl_init($url); //create a new cURL resource

	//set appropriate options
	curl_setopt($ch, CURLOPT_POST, 1);
	curl_setopt($ch, CURLOPT_POSTFIELDS, $params);
	curl_setopt($ch, CURLOPT_FOLLOWLOCATION, 1);
	curl_setopt($ch, CURLOPT_HEADER, 0);
	curl_setopt($ch, CURLOPT_RETURNTRANSFER, 1);

	$response = curl_exec($ch); //grab URL and pass it to the browser while assigning the response to `$response`

	curl_close($ch); //close cURL resource, and free up system resources

    return $response;
}

$APIURL = "https://staging.ecomm365.com/acqapi/service.ashx"; //Set API URL to eComm staging environment
$params = array(
"APISignature" => "SomeAPISignature", //API Signature
"MessageID" => GUID(), //A new GUID is required for every new API Call
"Username" => "SomeName", //API Username
"Password" => "SomePassword", //API Password
"Data" => "<R>...</R>" //Data fields required for request
);

$Response = httpPost($APIURL, $params); //User defined function used to POST data to API and assign the response to `$Response` variable
$XMLDataArray = simplexml_load_string($Response); //Used to parse XML at ease
?>
HttpWebRequest httpWReq = (HttpWebRequest)WebRequest.Create("https://staging.ecomm365.com/acqapi/service.ashx"); //Create webrequest while setting the API URL to eComm staging environment
UTF8Encoding encoding = new UTF8Encoding(); //Represents a UTF-8 encoding of Unicode characters.

string pData = "username=SomeName"; //API Username
pData += "&password=SomePassword"; //API Password
pData += "&messageId=" + System.Guid.NewGuid().ToString();  //A new GUID is required for every new API Call
pData += "&ApiSignature=SomeAPISignature"; //API Signature

pData += "&Data=" + WebUtility.UrlEncode(@"<R>...</R>"); //Data fields required for request

byte[] data = encoding.GetBytes(pData); //Getting Bytes for data

httpWReq.Method = "POST"; //HTTP Method - POST
httpWReq.ContentType = "application/x-www-form-urlencoded"; //Setting the correct Content Type
httpWReq.ContentLength = data.Length; //Getting Content Length

//Create POST data and convert it to a byte array.
byte[] byteArray = Encoding.UTF8.GetBytes(pData);

// Get the request stream.
Stream dataStream = httpWReq.GetRequestStream();

// Write the data to the request stream.
dataStream.Write(byteArray, 0, byteArray.Length);

// Close the Stream object.
dataStream.Close();

HttpWebResponse response = (HttpWebResponse)httpWReq.GetResponse(); //Assign response to `response` variable
string responseString = new StreamReader(response.GetResponseStream()).ReadToEnd(); //Obtain response from post

/* Parse XML from response */
XmlDocument xDoc = new XmlDocument();
xDoc.LoadXml(responseString);
/* END */

/* Obtain information from response fields */
XmlNodeList ResponseR1 = xDoc.GetElementsByTagName("R1");
XmlNodeList ResponseR2 = xDoc.GetElementsByTagName("R2");
//... etc

//Or loop through the elements
/* END */

//More code...
UDF List
Merchants can provide a UDF list that can contain up to two elements if the merchant wishes to include additional information back in their HTTP POST Response. The UDF list is made up of the <udf> parent tag ending with </udf>. The UDF children is defined using <I>...</I>. Using the correct format will successfully return the merchants UDF list without error, not using the correct format will not return the merchants UDF list.
The merchants UDF list will be returned in the transaction result response. The UDF list must be included within the DATA field when making the request. The UDF list must also be included within the <R> tags. Below, please find the Sample UDF List.
<!-- UDF Demonstration -->
<R>
	<R1>...</R1>
	...
	<udf>
		<I>testdata1</I>
		<I>testdata2</I>
	</udf>
</R>
API Responses
| Requirement | Value |
|---|---|
| XML Field Name | XML Field Data |
| R1 | Please see Appendix A for a list of available error codes. |
| R2 | Textual description of error |
Other data may also be provided depending on the API invoked.
Sample XML Response
<?xml version="1.0"?>
<R>
	<R1>0000</R1>
	<R2>Successful</R2>
	...
</R>
Sale, 3D Secure Confirm & Complete Pre-Auth Diagram
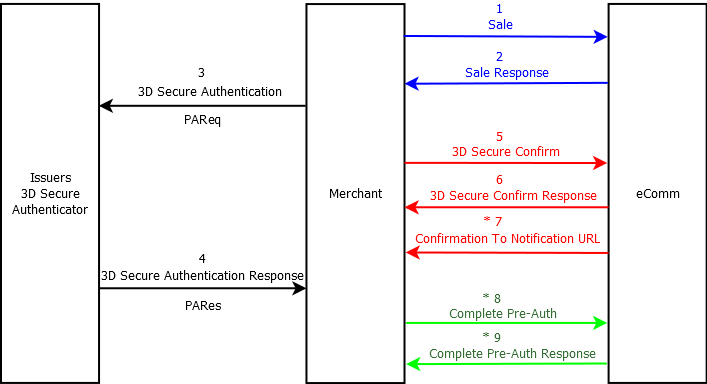
Please Note The Following:
Steps 8 and 9 are only done when the transaction uses authorisation followed by a clearing message at a later point.
Steps 3, 4, 5 & 6 are only done if the card is 3D secure.
Step 7 only occurs when the notification method is set to `notification` or `both`, this is set on the eComm side and the merchant must supply what method they wish to use, check out Notification Methods for more information.
Fund Authorisation Routes
eCOMM offers two routes for Authorising funds. Consult with a project manager to determine which route is to be implemented for your business.
Route 1 makes authorisation and clearing at one go.
The steps required are:
- Send a Sale (1) request with C in R1.
- Send a 3D Secure Confirm (5) request. (If the card is 3D Secure)
- Send a Sale (1) request with CA in R1.
- Send a 3D Secure Confirm (5) request. (If the card is 3D Secure)
- Send a Complete Pre-Auth (8) request.
Integration Process Overview
The Sale, 3D Secure Confirm & Complete Pre-Auth diagram above shows the process flow for integrating directly with the eCOMM API. This diagram illustrates the sequence of events required to integrate the payment process into a Merchant Site. Check out Hosted Payments Page or Hosted Payments Page (Token) for more specific details if this suits better.
These pages provide key information for communicating with the API, while using the correct syntax, to successfully complete a transaction.
This page gives an overview of the process flow for integrating directly and aims to be a good starting reference point.
Please Note The Following:
Step 2: Receive Sale Response
Step 3: *3D Secure Authentication Information
Step 4: *Receive PARes Payload (3D Secure)
Step 5: *Send 3D Secure Confirm
Step 6: *Receive 3D Secure Confirm Response
Step 7: Receive Confirmation to Notification URL
Step 8: *Send Complete Pre-Auth
Step 9: *Receive Complete Pre-Auth Response
Steps 3 - 6, only occurs if the card provided is 3D Secure.
Steps 8 - 9, only occurs if the transaction is a Pre-Auth.
Step 1, the details entered by a potential customer in the payment page form on the merchant site is collected and sent to our service via the 'Sale' API call. So in step 1 the customer's payment details are assembled in XML format and this data is sent to the API by using the HTTP POST method. All requests to the API must be executed using the POST method while ensuring the URL sent is encoded.
Step 2, the `Sale` API will respond with a fully formatted XML document, back to the merchant site which will include an error code and description, the response may also include other data depending if the provided card is 3D Secure or not. If the entered card is not 3D Secure and the request is successful, the response may include 0008 as the error code (Included in the R1 field in the XML response) for Confirmation Received (In this case the merchant will receive the response via the Notification URL) if the merchants Notification Method is set to: Notification or 0044 for Successful Transaction if the merchants Notification Method is set to: Both or Server. If the entered card is 3D Secure and the sale request is successful, the <R1> field inside the XML document will contain 0000 as the error code. The following fields will also be made available:
- ACSURL will be included in the R3 field which is used to redirect the customer to the 3D Secure service.
- PAReq which contains the encoded authentication request and is included in the R4 field which is automatically submitted to the 3D Secure service.
- PARes is included in the R5 field which is the reply received from the Issuing Bank after the card holder has been authenticated.
Step 3, we use the information in the `Sale` Response (step 2) to construct a HTML form with data that will be POSTED to the authentication site.
When the authentication site is loaded it requires the customer to provide an extra piece of information to validate themselves. The current method is
3D Secure and requires the customer to enter in a short password. Depending on the card type entered by the customer on the payment page the corresponding
authentication will be provided by 'Verified by VISA' or 'MasterCard SecureCode'.
The customer enters the required password and hits submit. This is then processed by the service and when a response is received the customer is returned to the merchant site.
The landing page where the customer returns on the merchant site is predetermined by a URL field in the form sent to the authenticator. This page is known as
the Term URL (Termination Page).
Step 4, the payment authentication response (PARes, included in R5 field in the XML response) is sent back to the merchant site. It is the Term URL page that receives the PARes payload.
Step 5, the PARes value returned from the authenticator is now passed onwards to the 'Confirm' API call which confirms the 3D Secure. The PARes is an alpha-numeric string that averages over 3000 characters in length. Included in this POST to the API are the transaction code that was sent in the initial `Sale` request and the merchant's own vendor ID (VID).
Step 6, the XML response of step 5 is received at the Term URL page, this data will include an error code and description like the previous response.
If successful, the response may include 0008 as the error code (Included in the R1 field in the XML response) for Confirmation Received (In this case the merchant will receive the response via the Notification URL) or 0044 for Successful Transaction.
Any other error code represents an error state, please see API Responses for more information regarding responses.
* Step 7, if the merchants setup is to send notifications, the results of the completed transaction are sent to the notification URL. The notification URL is one of the form fields
in the initial Sale call to the API. The merchant should set up this notification page to read and parse the XML document received from the API.
This data includes the results of AVS/CV2 checks, 3D Secure checks and confirmation types.
Please see Notification Methods for more information.
* Step 8, if the transaction is a Pre-Auth and if the merchant wants to complete this pre-auth, they can do so by supplying the Transaction Code of the pre-auth transaction and the total amount they wish to complete.
* Step 9, the merchant will receive the response from the request and if successful, the funds will be processed as normal.